Introduction:
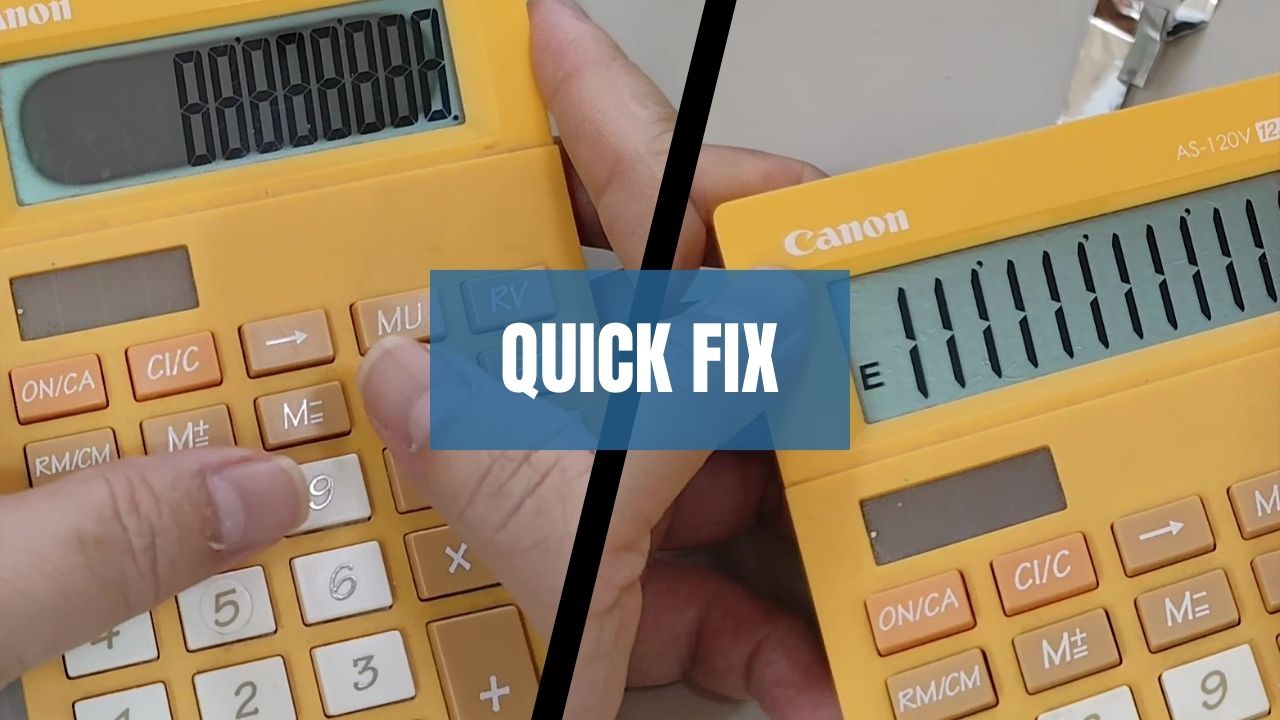
Does your calculator’s LCD screen appear discolored, have dark spots, or become difficult to read? While replacing the reflective film might be a more permanent solution, a surprisingly quick DIY fix exists using readily available materials.
This guide will show you how to restore clarity to your calculator’s screen using aluminum tape, saving you time and money.
Materials Needed:
- Calculator with a bad LCD screen
- Non-conductive aluminum tape
- Scissors or sharp blades
- Cotton swabs
- Diluted rubbing alcohol or lens cleaner (optional)
- Soft cloth
- Plastic opening tool (optional)
Step 1: Preparation
Before starting, ensure your calculator is powered off and remove any batteries.
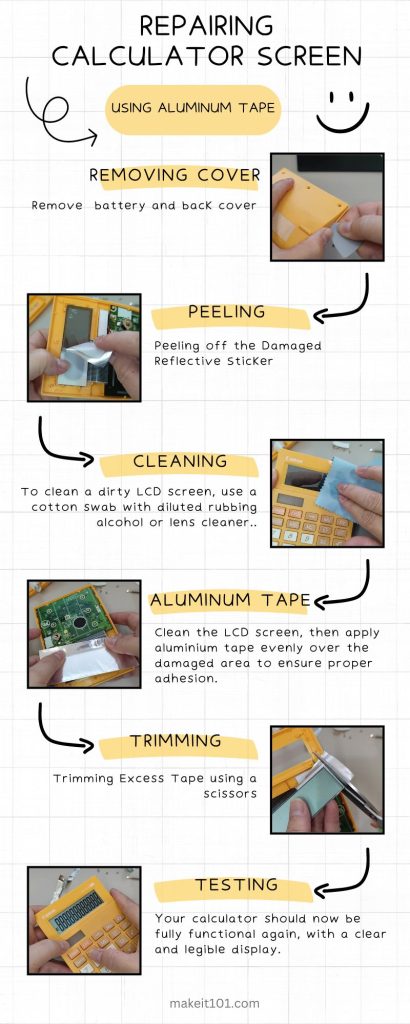
Step 2: Removing the Plastic Cover
Use a plastic opening tool (recommended) or a screwdriver to carefully remove the screws securing the back cover. Once removed, gently pry the back cover off using your fingers. Be cautious and avoid applying excessive force to prevent damage.
Step 3: Peeling off the Damaged Reflective Sticker
Discolored areas on the LCD, like blue or dark spots, often stem from a deteriorated reflective sticker behind the screen. Wear gloves to avoid fingerprints (optional).
Carefully peel off the damaged sticker using your fingernail or a plastic tool. Be gentle to avoid scratching the LCD screen itself. Once removed, you’ll see the actual LCD display beneath.
Step 4: Assessing the LCD Screen
Inspect the LCD screen for any visible damage or glue residue. This will help identify areas requiring attention during cleaning.
Step 5: Cutting Aluminum Tape
Take a piece of non-conductive aluminum tape slightly larger than the damaged area on the LCD screen. Use scissors or sharp blade to carefully cut the tape to match the size and shape of the affected area. It’s better to cut slightly larger for full coverage.
Step 6: Cleaning the LCD Screen
If the LCD screen appears dirty, dusty, or has residue, use a cotton swab dipped in a diluted solution of rubbing alcohol or lens cleaner to gently clean the surface. Be cautious and avoid applying too much pressure.
Step 7: Applying Aluminum Tape
Peel off the backing of the aluminum tape and carefully place it over the damaged LCD area. Press down firmly to ensure good adhesion and smooth out any air bubbles or wrinkles. Ensure the tape covers the entire affected area evenly.
Step 8: Trimming Excess Tape
Use scissors to precisely trim any excess aluminum tape around the edges of the LCD screen. This ensures a neat appearance and avoids covering any functional parts of the calculator.
Step 9: Testing the Calculator
Once you’ve applied the aluminum tape, reinsert the batteries (if removed) and turn on the calculator. Check the LCD screen to see if the clarity has improved and the display is now readable.
Step 10: Final Touches
If the repair is successful, gently wipe the surface with a soft cloth to remove any fingerprints or smudges. Your calculator should now be fully functional again, with a clear and legible display.
Conclusion:
Repairing a faulty calculator display with aluminum tape is a straightforward and cost-effective process. By following these steps carefully, you can breathe new life into your old calculator.
Remember to power off the device before starting and dispose of any removed parts responsibly.
Share your thoughts in the comments below!